
Trying to Film My Blanket Progress (It’s Harder Than It Looks)
I finally set up my tripod to start filming my crochet blanket progress, and wow, it’s a lot harder than I thought! I imagined it would be simple: set up the camera, start crocheting, and capture a relaxing little time-lapse. In reality, it took forever to find the right angle. Every time I started filming, the tripod would slip, the lighting would change, or my hands or legs would somehow block the view.
It’s also funny how aware I get of every single movement once the camera is on. Suddenly, I’m thinking about how my hands look, whether the yarn is in frame, or if I’m accidentally making weird faces while concentrating. Not exactly the calm, aesthetic process I had in mind!
Still, I’m glad I’m trying to document everything. It’s cool to see little clips of my progress, even the messy parts, because it shows how much work goes into each row. I think once I get the hang of positioning the tripod and lighting, it’ll get easier. For now, it’s all about trial, error, and lots of readjusting between stitches.
I finally started my crochet blanket, and honestly, I’m beyond excited about it. After weeks of gathering my yarn, checking out patterns, and watching a few how-to videos, it actually felt amazing to begin. The first few rows were a little tricky. My loops kept getting uneven, and I had to redo parts a couple of times. I have only used a hook to crochet, and tension with just your hands is so hard!
Once I thought I had it, I didn’t. I had to recount my stitches and start over yet again.
Finally Finding My Groove
Light It Up
Today I actually got to try the technique of melting the ends of my yarn together, and it honestly felt like a game-changer. Instead of tying big, bulky knots, I used heat to fuse the ends, which makes the blanket look so much smoother and more seamless. It was a little intimidating at first. I was nervous about getting too close to the lighter and accidentally burning the yarn, but after a couple of tries, I got the hang of it.
The trick is to melt just enough to make the wick of the yarn tacky, then quickly press them together before they cool. Once it sets, you can barely tell there was ever a join. It feels so satisfying seeing the yarn stay strong and neat, especially since I want this blanket to look as polished as possible.
It’s one of those small details that makes a big difference. Plus, it’s fun learning these little hacks along the way; every step teaches me something new about the craft.
There’s something really calming about the process. It’s just me, my yarn, and some quiet time to focus. I’m already seeing the blanket take shape, and that’s the best part: watching something grow from just a pile of yarn into something cozy and beautiful.
Three Colours Done!
I’ve officially finished the first three colours of my blanket, and I’m so happy with how it’s coming together. The transitions between the shades look even better than I imagined. Each section has its own little story, from figuring out the right tension in the first colour to finally finding my rhythm by the third.
I’m pausing here for a bit because the next section is going to take a while. It’s a bigger chunk of the pattern, and I want to take my time with it so it stays neat and even. Honestly, I’m kind of glad to have this little checkpoint. It’s nice to look back and see how much progress I’ve made already.
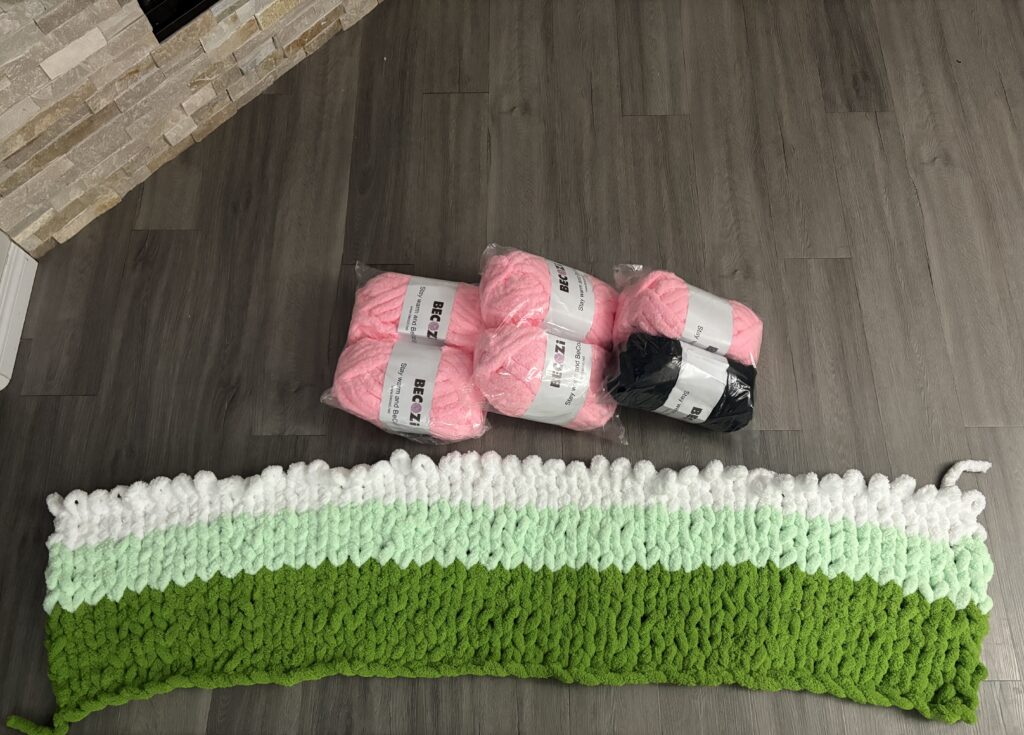
With 43 stitches to each row, 1.5 skeins of green, 1/4 of a skein of each ice green and white, I’m, as the kids these days say, “cooking”, and I can’t wait to keep going! This is definitely the start of something special!