When I first started this blanket, I just thought it would be a fun, creative project. Something colourful to work on in the evenings, a mix of calm and accomplishment stitched into every row. I didn’t realize how much it would teach me about patience, persistence, and finding comfort in slow progress.
There were definitely some hiccups, like the moment I dropped a stitch and had to unravel part of the pink section I’d spent hours on. I was frustrated at first, but redoing it ended up making the blanket stronger and more even. It became a little metaphor for life: sometimes you have to pull things apart and start again to make them better.
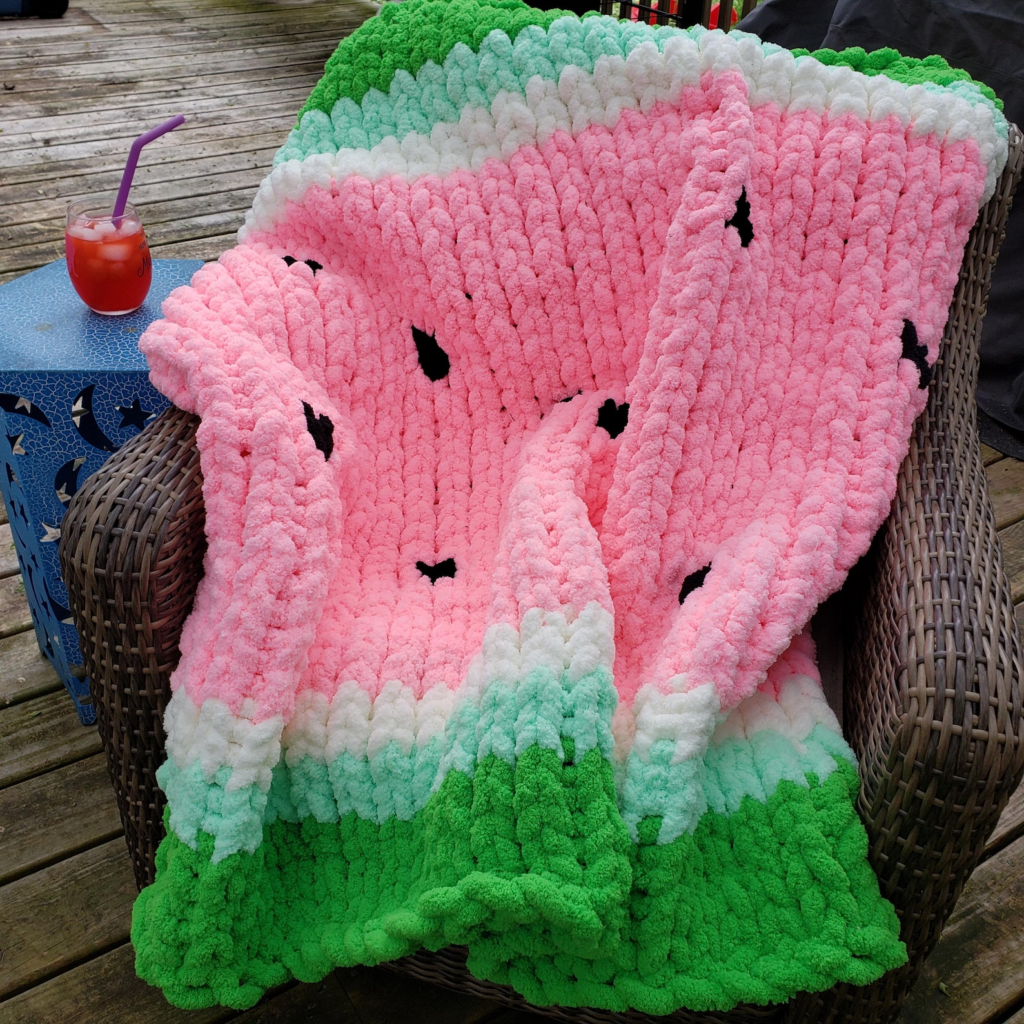
By the time I finished adding the seeds and the rind, I wasn’t just proud of the way it looked, I was proud of the time and care I’d put into it. Each colour holds a memory: the early excitement of starting, the pink-section persistence, the calm rhythm of the final rounds.
Now that it’s finished, my watermelon blanket feels like more than a cozy summer-themed throw. It’s a reminder that creating something by hand is slow and sometimes messy, but that’s what makes it meaningful. It’s not perfect — and that’s exactly why I love it.
One of the trickiest parts of crocheting, and something I’m forever working on, is tension. It’s that invisible balance between how tightly or loosely you hold your yarn. Too tight, and your stitches end up stiff and hard to work into. Too loose, and everything looks uneven and floppy.
When I first started my blanket, my tension was all over the place. Some rows were snug and perfect, while others stretched out like they were trying to escape. I’ve learned that tension isn’t just about how you hold the yarn; it’s about your mood, your posture, and even how relaxed you are. If I’m tense, my stitches are too. When I’m calm, everything flows more evenly.
Finding that sweet spot takes practice. Sometimes it means pausing, shaking out your hands, and letting your shoulders drop before starting again. Now I try to treat it like a rhythm, steady, even, and patient. Once you get into that groove, crocheting starts to feel less like a task and more like a quiet little dance between your hands and the yarn.
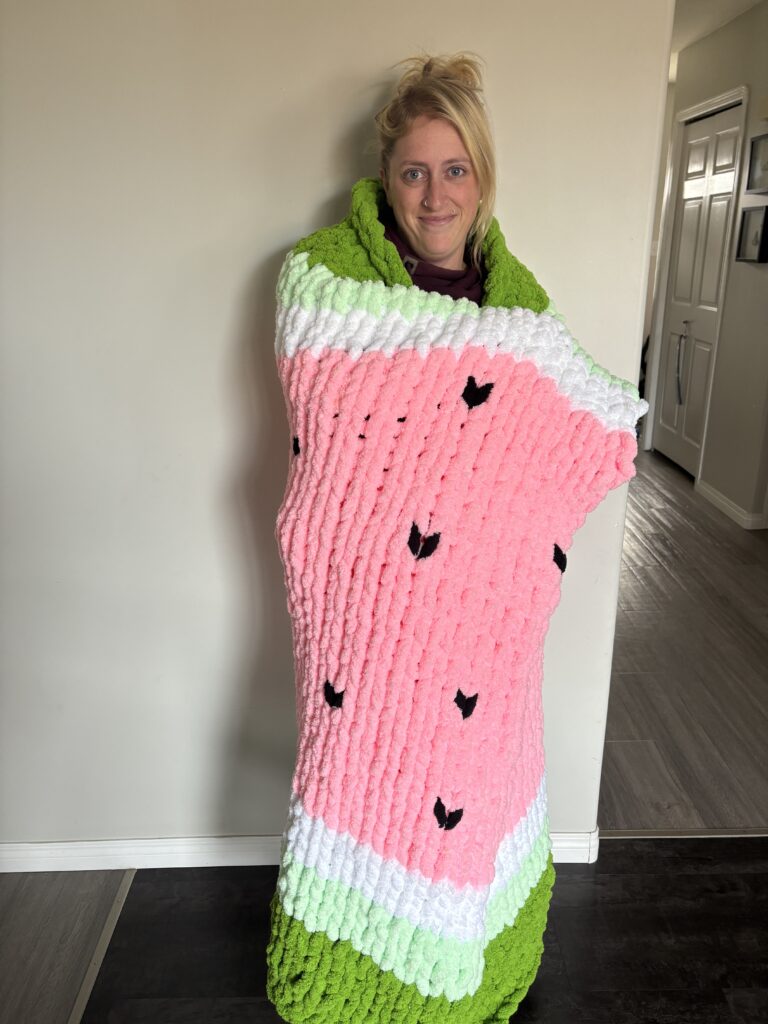
The Sweet Finish: Completing My Watermelon Blanket
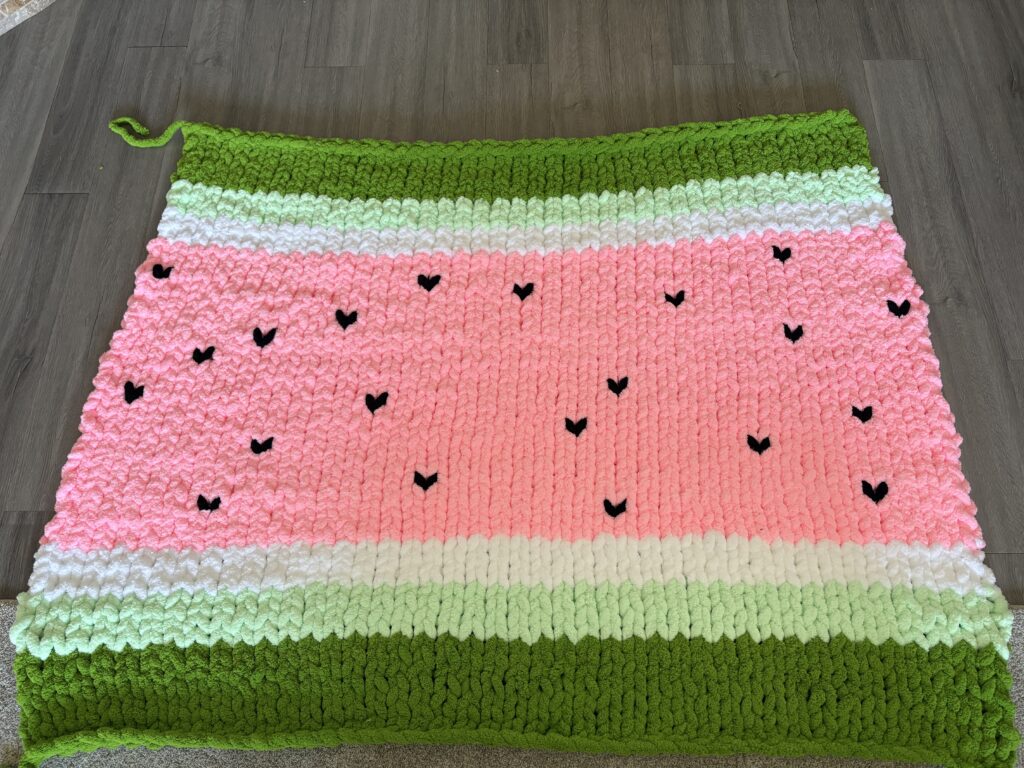
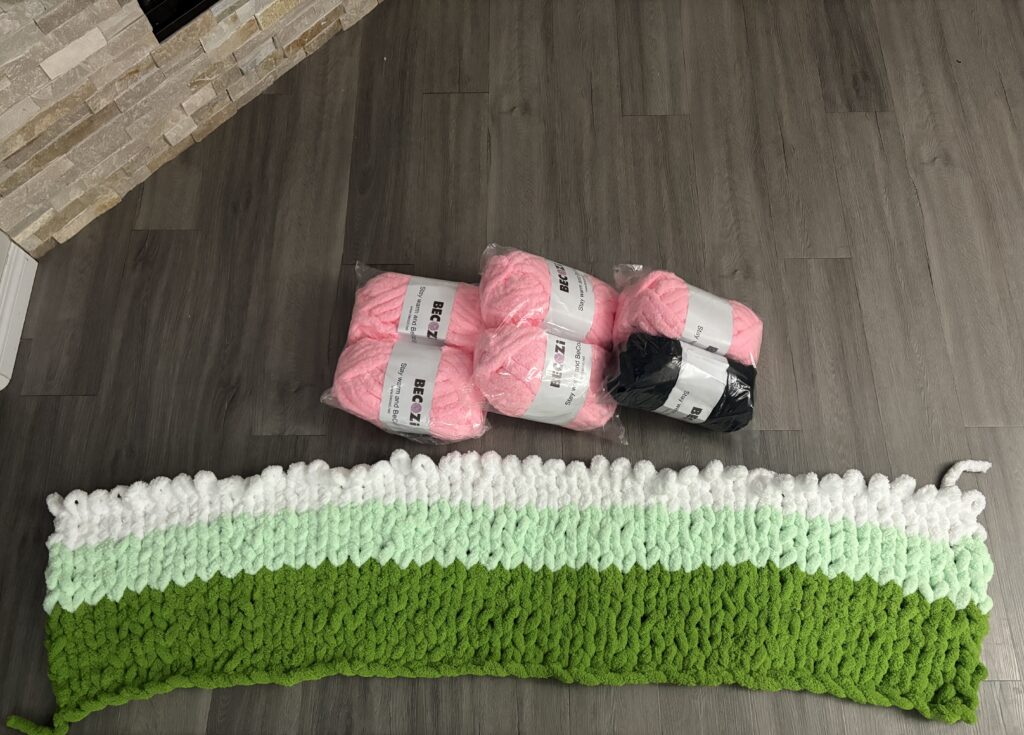
After weeks of crocheting, undoing, redoing, and more than a few late-night stitching sessions, I finally finished my watermelon blanket, and it’s honestly even better than I imagined. The last section, therind, tied everything together perfectly. Adding the thin white border between the pink and green made the colours pop, just like a real slice of watermelon. It’s such a small detail, but it completely transformed the look.
As I worked through the final rounds of dark green, there was this quiet satisfaction in every loop. Each stitch felt like closing a chapter. The green base, the pink fruit, the little seeds that made it come alive, and now this smooth, finished edge that sealed the whole thing together.
When It All Comes Together
When I finally snipped the last strand of yarn, I stood up, spread the blanket out across my floor and just stared at it for a minute. It’s bright, soft, and has a bit of personality in every stitch, including the spots where I had to pull things apart and start again. Those little imperfections are what make it mine.
Finishing this blanket reminded me that handmade projects aren’t just about the final product; they’re about patience, persistence, and finding calm in the repetitive rhythm of the work. Now it’s ready to keep me cozy all winter long, reminding me that summer is never too far away.
After finishing the soft green base of my watermelon blanket, I finally moved on to the fun part, the pink “fruit” section! This part has honestly been the most satisfying yet time-consuming part so far. As soon as the pink yarn started looping through my fingers, the whole blanket began to look like a watermelon instead of just a cozy mystery blob.
When Things Unraveled (Literally)
Once I got going on the pink section, I was totally in the zone. Looping along, feeling proud of how fast it was coming together. And then… I noticed it. A dropped stitch hiding halfway down the row, just sitting there mocking me. At first, I tried to convince myself it wasn’t a big deal, that maybe no one would notice. But once you see a mistake in crochet, you can’t unsee it.
If you’ve ever crocheted (or knitted), you know that a dropped stitch is basically every crafter’s little nightmare. It’s when one loop doesn’t get worked into the next row, kind of like forgetting to button one hole on your shirt and then realizing it way too late.
At first, it seems like a minor mishap, just one tiny loop hanging loose, but that single stitch can throw off the whole pattern. Over time, it can unravel a whole section, create a visible gap, or make one side of the project start to lean or shrink. In my case, the dropped stitch was right in the middle of the pink section, so it would have stood out like a missing seed in the fruit!
The tricky part is that dropped stitches love to hide until you’ve gone way too far to fix them easily. That’s exactly what happened to me. I was feeling confident, moving fast, and then I spotted the little gap that shouldn’t have been there. The only fix? Pull it apart and redo that part. Talk about frustrating!
It’s irritating in the moment, but catching a dropped stitch early is actually a blessing. It keeps the blanket strong and even, and honestly, redoing it gave me a chance to slow down and appreciate the process instead of rushing through it. Every project has its hiccups, and this was mine for the pink section.
So, I sighed, pulled the yarn back, and started unravelling. There’s that split second where you watch your work come undone and wonder why you do this to yourself, but once I began reworking it, I felt at peace with it. Redoing the section actually helped me fix my tension and make the stitches more even. It’s funny how sometimes a mistake ends up making the final piece better.
Little Black Seeds
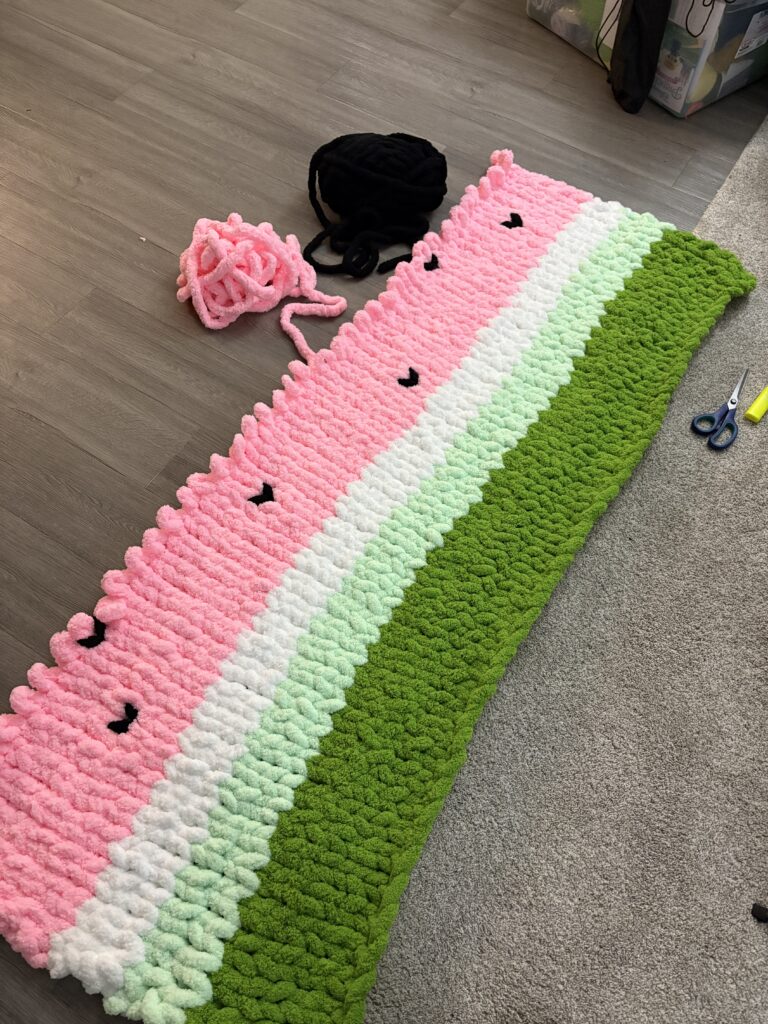
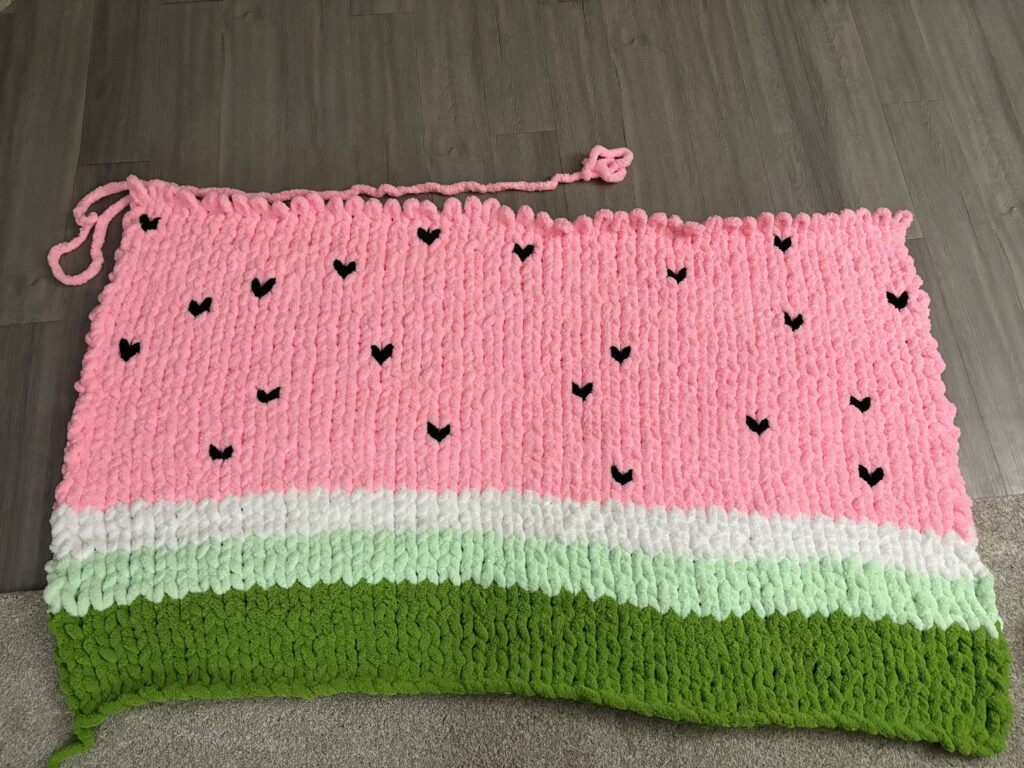
Once the first few rows of the pink section were underway, I started adding the seeds—the little black details that bring the whole piece to life. I used small loops of black yarn stitched in unevenly spaced spots, just like real watermelon seeds. They don’t have to be perfect (and that’s the best part). The tiny imperfections make it feel organic and natural, like something actually grown instead of made.
I decided it was time for a break. I stretched, rolled my shoulders, and grabbed some dinner. It’s funny how stepping away for even half an hour can reset your energy. Once I sat back down, I felt refreshed and ready to tackle more. I sat on the floor once again and cracked open the third skein of pink yarn. At that point, it really hit me how big this blanket was getting. The rows were taking longer, but seeing it grow with every round was so satisfying.
Somewhere around row 13 of the pink section, I realized just how much time I’d spent hunched over my blanket. My back was absolutely killing me. The kind of ache that only comes from sitting too long, too focused, and forgetting that posture is a thing. I decided that now is a good time for a hot shower to try and soothe my aches and pains.
It was now 10:00 p.m., and I was determined to complete this section.
There’s something meditative about watching each section come together, green to pink to the little pops of black. It’s like the blanket tells its own story as it grows in front of me. Each colour change feels like a milestone, and now I can really see how the final design will come together once the white and darker green borders are added.
11:30 p.m., and the fruit section was complete! It was time for bed, with a satisfying feeling of finally being done, having completed 3 hours of work on this part alone.
Next up: wrapping it all together with the rind! But for now, I’m just enjoying the bright, summery vibe of this pink middle. It is bringing me life in this cold and windy fall we are having.
Trying to Film My Blanket Progress (It’s Harder Than It Looks)
I finally set up my tripod to start filming my crochet blanket progress, and wow, it’s a lot harder than I thought! I imagined it would be simple: set up the camera, start crocheting, and capture a relaxing little time-lapse. In reality, it took forever to find the right angle. Every time I started filming, the tripod would slip, the lighting would change, or my hands or legs would somehow block the view.
It’s also funny how aware I get of every single movement once the camera is on. Suddenly, I’m thinking about how my hands look, whether the yarn is in frame, or if I’m accidentally making weird faces while concentrating. Not exactly the calm, aesthetic process I had in mind!
Still, I’m glad I’m trying to document everything. It’s cool to see little clips of my progress, even the messy parts, because it shows how much work goes into each row. I think once I get the hang of positioning the tripod and lighting, it’ll get easier. For now, it’s all about trial, error, and lots of readjusting between stitches.
I finally started my crochet blanket, and honestly, I’m beyond excited about it. After weeks of gathering my yarn, checking out patterns, and watching a few how-to videos, it actually felt amazing to begin. The first few rows were a little tricky. My loops kept getting uneven, and I had to redo parts a couple of times. I have only used a hook to crochet, and tension with just your hands is so hard!
Once I thought I had it, I didn’t. I had to recount my stitches and start over yet again.
Finally Finding My Groove
Light It Up
Today I actually got to try the technique of melting the ends of my yarn together, and it honestly felt like a game-changer. Instead of tying big, bulky knots, I used heat to fuse the ends, which makes the blanket look so much smoother and more seamless. It was a little intimidating at first. I was nervous about getting too close to the lighter and accidentally burning the yarn, but after a couple of tries, I got the hang of it.
The trick is to melt just enough to make the wick of the yarn tacky, then quickly press them together before they cool. Once it sets, you can barely tell there was ever a join. It feels so satisfying seeing the yarn stay strong and neat, especially since I want this blanket to look as polished as possible.
It’s one of those small details that makes a big difference. Plus, it’s fun learning these little hacks along the way; every step teaches me something new about the craft.
There’s something really calming about the process. It’s just me, my yarn, and some quiet time to focus. I’m already seeing the blanket take shape, and that’s the best part: watching something grow from just a pile of yarn into something cozy and beautiful.
Three Colours Done!
I’ve officially finished the first three colours of my blanket, and I’m so happy with how it’s coming together. The transitions between the shades look even better than I imagined. Each section has its own little story, from figuring out the right tension in the first colour to finally finding my rhythm by the third.
I’m pausing here for a bit because the next section is going to take a while. It’s a bigger chunk of the pattern, and I want to take my time with it so it stays neat and even. Honestly, I’m kind of glad to have this little checkpoint. It’s nice to look back and see how much progress I’ve made already.
With 43 stitches to each row, 1.5 skeins of green, 1/4 of a skein of each ice green and white, I’m, as the kids these days say, “cooking”, and I can’t wait to keep going! This is definitely the start of something special!
ROAD TRIP!! Sometimes the best part of a project isn’t just making it, it’s the adventure that comes with gathering what you need. This weekend, I took a spontaneous trip down to Montana to pick up the yarn for my blanket project, and honestly, it turned into more than just a supply run.
Crossing the border felt like a mini getaway. The fall colours were incredible, golden trees lining the highway, mountains dusted with the first hint of snow, and that crisp air that makes you want to roll down the windows just to breathe it in. I had my coffee, a good playlist, and that cozy feeling of excitement that comes with starting something new.
The border guard on the way back into Canada made my whole day. He was insanely friendly and funny. We joked around about what I was bringing home, and we both had a good laugh when he mentioned he was also a thirty-something-year-old with an 80-year-old soul.
The Unboxing Moment
When I got home, I could hardly wait to open my parcel. Even though I knew exactly what was inside, it still felt like Christmas morning. I carried the package into my living room, sat on the floor, and ripped through the plastic like a kid who can’t wait another second.
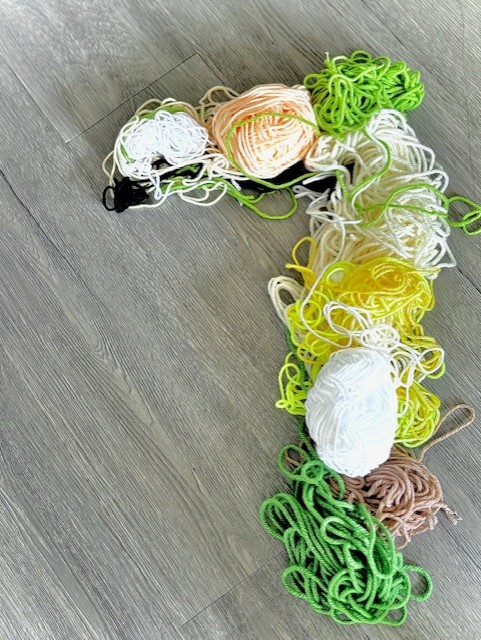
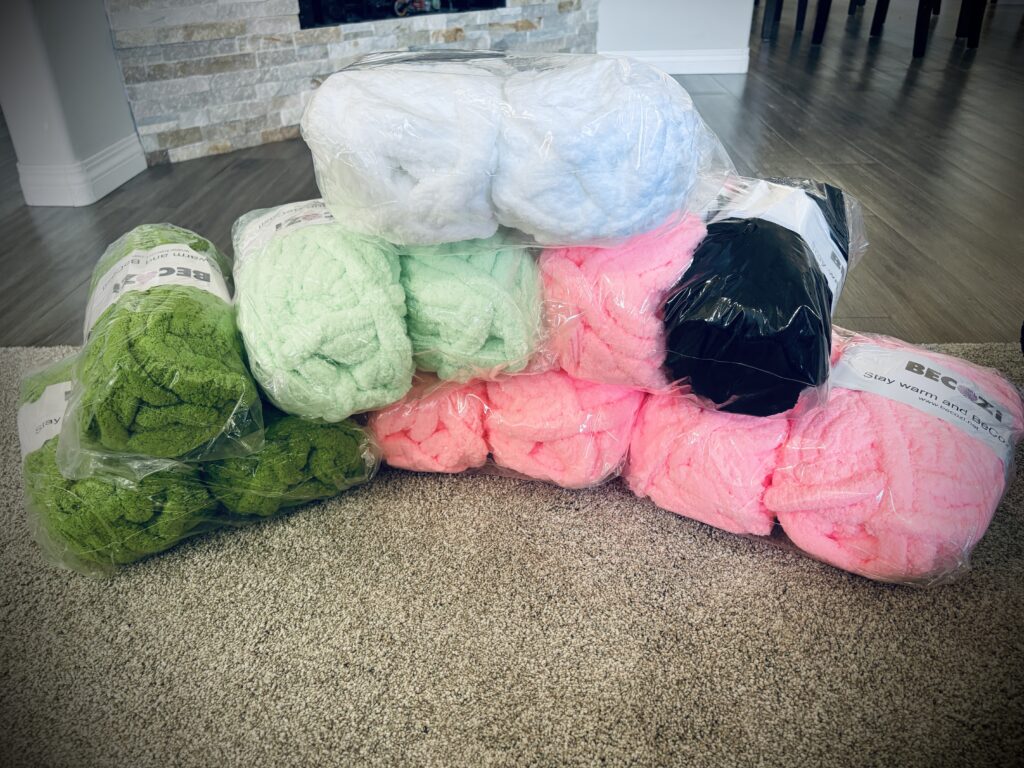
Inside was a mountain of soft, chunky yarn, all perfectly squished together. I had to check each skein, just to make sure everything I ordered had arrived, and of course, to admire every colour up close. The texture was even better than I’d imagined. I couldn’t help but pull one out, give it a little squish, and picture the blanket starting to take shape.
After the drive and all the anticipation, finally seeing (and touching!) the yarn made it feel real. This project wasn’t just an idea anymore; it was sitting right there in front of me, ready to become something beautiful.
Getting Ready to Film the Process
After unpacking all that gorgeous yarn, my mind immediately jumped to the next step—capturing the process. I’ve always loved watching those satisfying crochet and knitting videos where you can actually see something cozy come to life, loop by loop. I want to create my own version of that, sharing the journey from start to finish.
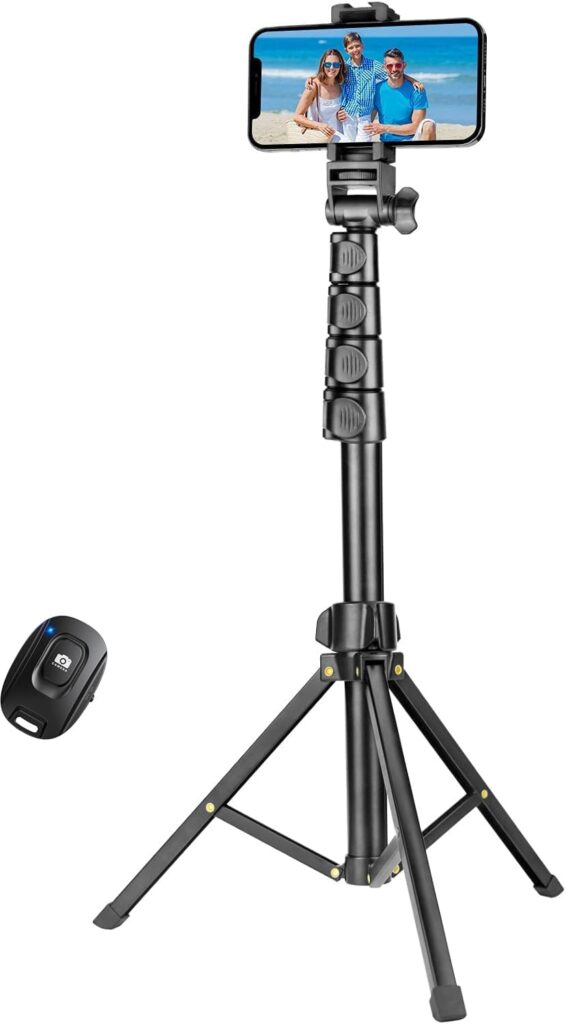
The only problem? I quickly realized I didn’t have the right setup. Balancing my phone on random objects wasn’t going to cut it (trust me, I tried). So, I ended up ordering a tripod from Amazon for my phone. I chose this one because the price was right, and I liked that it came with a remote to start recording. It felt like the official next step, an investment in documenting the creative side of things, not just doing the project itself.
Now I’m picturing my future workspace: yarn laid out, camera steady, and that peaceful rhythm of hand weaving captured on video. It’s exciting to think I’ll be able to look back and actually see the progress, not just the finished blanket.
There’s something really special about starting a creative project, that feeling of excitement before anything has even been made. For me, that project is a chunky hand-made blanket. I haven’t started looping the yarn yet, but the planning and preparation have already been such a fun but stressful part of the process. I’ve been working on gathering materials, watching videos, and imagining what the finished blanket might look and feel like.
Finding the Perfect Pattern
After scrolling through countless patterns online, I found one that instantly stood out to me: the Chunky Knit Pattern – Watermelon on Etsy. It’s sold by an independent creator, DowntimeWithDawn, who specializes in cozy, modern knit and crochet designs.
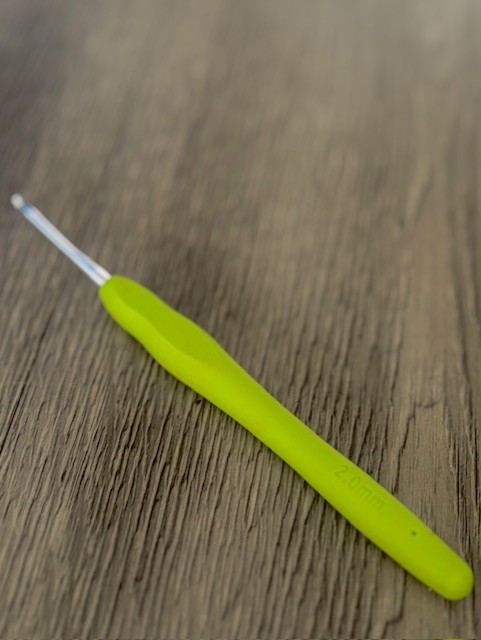
What I loved most about this pattern was how approachable it looked. It’s designed for chunky yarn and hand-knitting, so no hooks or needles are required, just your hands. Even though the pattern name “Watermelon” suggests bright colors, it can be made in any palette, which gives it a nice creative freedom. I could have taken the easy route and just created a blanket with a single colour of yarn for ease of learning, but I wanted to take on a challenge.
Gathering My Yarn
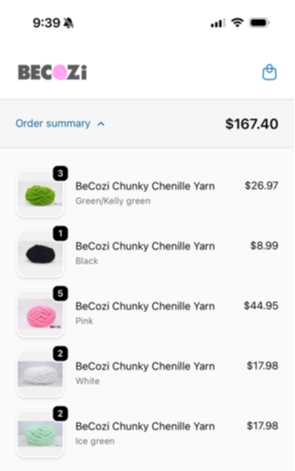
To make the blanket, I ordered my yarn from BeCozi, a small business from the United States of America that specializes in chunky yarns and hand-knitting supplies. Their chunky chenille yarn is thick, velvety soft, and perfect for the oversized stitches this pattern calls for.
The site made it easy to figure out how much I needed, with sizing guides for different blanket dimensions — lap throw, couch blanket, bed-size, and more. Knowing that the yarn is made specifically for hand-knitting gives me confidence that it will be durable yet cozy. I can already imagine how satisfying it will feel to weave those big loops together and see the blanket slowly take shape.
One thing that is incredibly hard to overcome when making crocheted creations is that yarn isn’t cheap! I knew taking on this project would be expensive, but since we live in such a rural area, finding the exact yarn in all the colors I needed for this specific blanket was not without difficulty. Boy, was it a hard pill to swallow when I found out how limited my options were.
Learning from Video Inspiration
Before I dive in, I’ve also been watching a few helpful videos to build my confidence. One of my favorites is a reel where the creator demonstrates how to start a blanket by forming what she calls a “perfect loop” — or a “nine.” (Instagram reel link) Watching her hand movements helped me understand how to make that first loop feel even and secure, which seems like such an important foundation for the whole blanket.
I also found another short video showing how to close off the blanket cleanly. (Instagram reel link) Even though I’m nowhere near that stage yet, it’s nice to visualize the full process — from the first loop to the last stitch.
I also needed to research how to change the yarn colour, as I know from previous experience that the size and type of yarn I plan to use for my blanket require a much different approach. I found this video on YouTube to show me how, and I’m nervous but excited to try this new technique. I have a feeling I will be taking to YouTube for more videos during my process.
Looking Ahead
Even though I haven’t started crocheting yet, I already feel connected to this project. Every step, choosing the pattern, ordering the yarn, and learning the techniques, has reminded me how much joy there is in slowing down and making something with your hands.
My yarn has arrived at the Montana Shipping Outlet in Eureka, Montana. When I find the time to go and pick up my yarn, I’ll finally roll it out, make that “perfect loop,” and begin. I know it’ll take patience and practice, but I’m excited to see it unfold, one loop at a time.
For my free inquiry project, I decided to explore a different technique in the art of crocheting. I’ve been crocheting for about two years, primarily at a beginner level, following simple patterns and learning basic stitches.
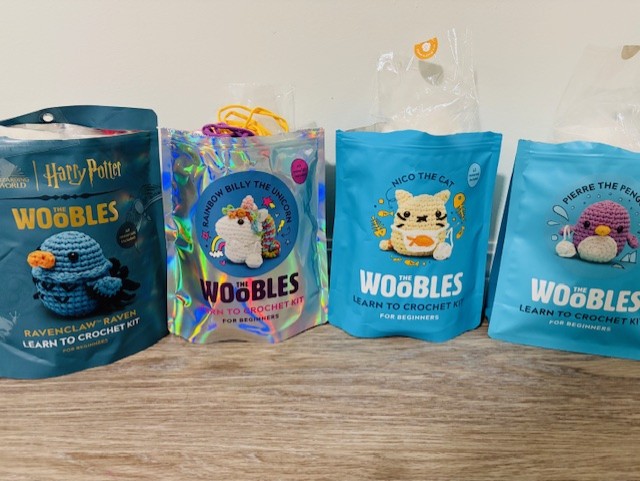
I started using beginner’s kits called The Woobles. These kits come with everything you need to start, including all your yarn, hooks, stitch markers, stuffing, embroidery needles, safety eyes, and online, step-by-step instructional videos.
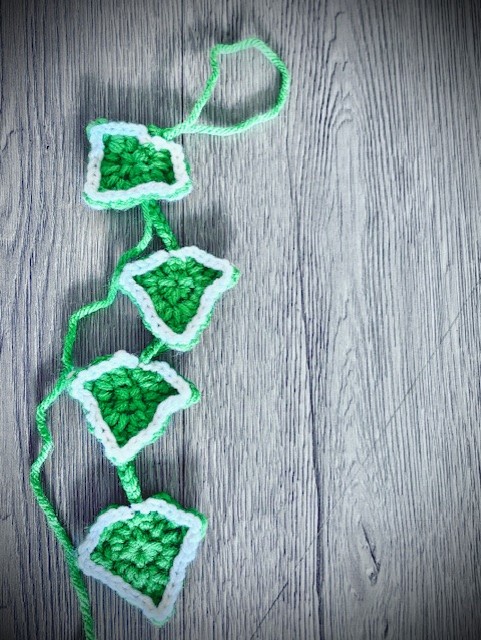
Once I had mastered my basic skills, I began to discover online patterns that piqued my interest. I discovered an amazing Etsy creator who crafts beautiful floral baskets and intricate plant patterns. You can find her under PHoaCrochet.
I then started following a creator on Instagram who makes hand-crocheted blankets. Instead of using hooks, she uses her hands to make the stitches (Wildly Woven). There are so many interesting techniques she uses to make her blankets, and it got me thinking I would like to attempt to make one myself. This is a new venture for me, as I have only ever used a hook to crochet.
This time, I wanted to move beyond what I already knew and challenge myself to understand the craft more intentionally and creatively. Crocheting has always been something I find calming and rewarding, but I was curious to see how far I could develop my skills and what new techniques I could learn with focused time and research.
Over the next couple of months, I will document my journey in hand-crocheting a blanket. Through this project, I aimed to refine my technique, experiment with new patterns, and create a finished piece that demonstrates growth from my initial work. I also wanted to reflect on the process itself—how crocheting encourages patience, creativity, and mindfulness. By taking the time to study this craft more deeply, I hoped not only to enhance my abilities but also to appreciate the artistry and tradition behind crocheting better.